
Setting up an effective WooCommerce wholesale registration form is one of the smartest investments you can make for your B2B store.
Based on our five years of experience managing wholesale operations, we’ve seen firsthand how the right registration system transforms business relationships and streamlines customer onboarding.
A wholesale registration form setup does more than just collect information—it automates your entire wholesale customer verification process, reduces manual workload, and establishes trust with your B2B buyers from day one.
According to recent data, 73% of B2B buyers prefer digital interactions over traditional sales methods, making a seamless online registration experience absolutely critical.
In this guide, you’ll discover exactly how to build a B2B registration form for WooCommerce that handles auto-approvals, manual reviews, and custom fields, all without writing a single line of code. If you want to dive deeper into plugin setup or best practices, check out the How To Use Whols Guide.
Why WooCommerce Wholesale Registration Forms Matter
The standard WooCommerce registration form is built for retail customers, not wholesale buyers. A wholesale registration form collects business-specific information (company name, tax ID, resale certificate) and grants access to your B2B pricing behind a proper verification step.
Unlike retail buyers who want a frictionless checkout, wholesale buyers expect a structured onboarding experience. They need to provide business credentials, payment term preferences, and purchasing volume details. Without a dedicated form, you have no way to collect this information or control who gets access to your wholesale prices.
According to a 2025 research report, 79% of businesses rank their registration forms as the most effective tool for gaining new prospect data, making professionally designed wholesale registration forms essential for conversion and pipeline growth.
A properly configured WooCommerce wholesale registration form achieves five things:
- Automates customer vetting — auto-approve qualified customers or require admin review
- Collects essential business data — company name, tax ID, resale certificates, order volumes
- Creates a professional first impression — signals you are serious about B2B partnerships
- Streamlines onboarding — automated email notifications eliminate back-and-forth communication
- Protects your wholesale pricing — prevents retail visitors from seeing B2B prices before logging in
If you are new to wholesale, read What Is Wholesale Pricing? Benefits, Strategies, and Examples before diving into the setup.
Getting Started with Plugin Installation
To build a professional B2B registration form WooCommerce, you’ll need a dedicated wholesale plugin.
Find out about plugin options and competitive features in the Compare Whols and Others guide.
The Whols plugin has been downloaded over 57,590 times and is one of the most trusted solutions for wholesale registration in the WooCommerce ecosystem.
System Requirements
Before installation, review the Whols Documentation for system requirements.
- WordPress 5.0 or higher.
- WooCommerce 4.0.0 or higher (latest version recommended).
- PHP 7.4 or higher.
- Active HTTPS encryption on your domain.
Step 1: Install and Activate the Whols Plugin
Whols is the plugin that powers your wholesale registration form. It adds the Form Builder, the registration shortcode, approval controls, and all email notification settings. Installation takes under two minutes.
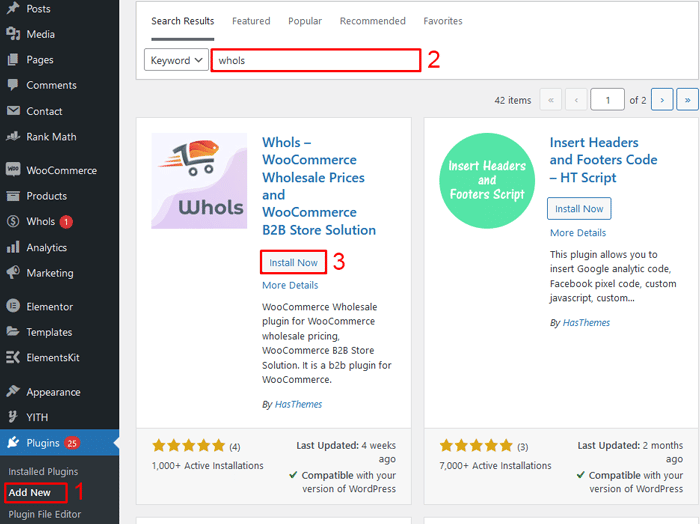
Step 1.1: Navigate to Plugins
Log in to your WordPress dashboard and click on Plugins from the left sidebar menu. You’ll see all currently installed plugins displayed on this page.
Step 1.2: Search for Whols
Click the Add New button at the top of the page. This opens the WordPress plugin repository search interface. Type “Whols” in the search bar and wait for results to load.
Step 1.3: Install the Plugin
When the Whols plugin appears in the search results, click the Install Now button. WordPress will automatically download and install the plugin files to your site. This typically takes 15-30 seconds, depending on your connection speed.
Step 1.4: Activate the Plugin
After installation completes, the button will change to Activate. Click it to activate the plugin on your site. Once activated, you’ll see a new Whols menu item appear in your WordPress dashboard’s left sidebar.
For step-by-step setup, see the How To Use Whols Guide.
Step 2: Access the Form Builder
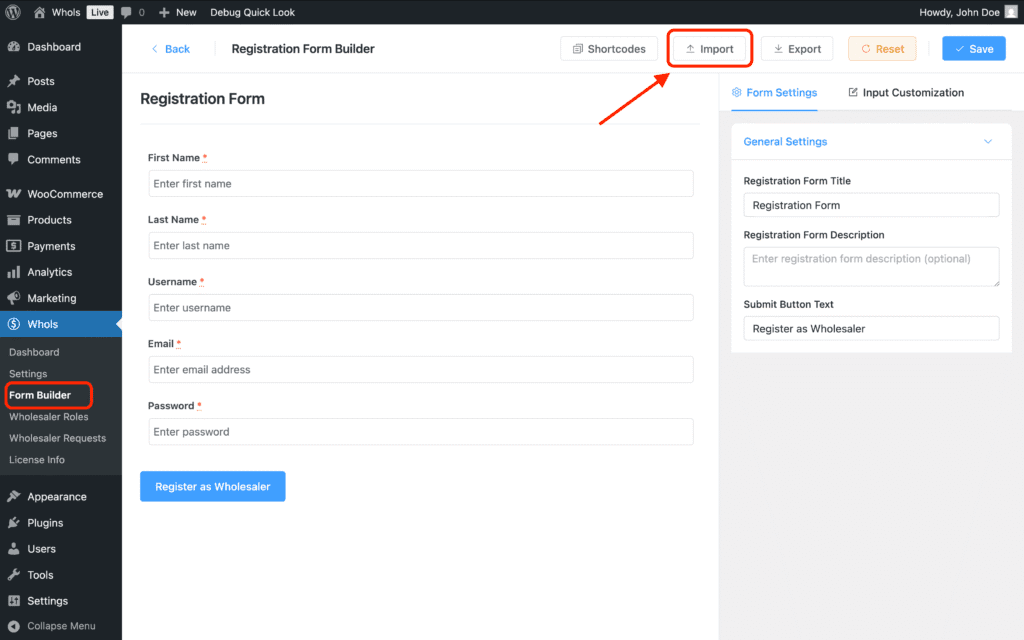
The Form Builder is the drag-and-drop editor inside Whols where you add, reorder, and configure registration form fields. Access it via Whols → Form Builder in your WordPress dashboard. It requires no coding and changes apply instantly.
Locating the Form Builder
From your WordPress dashboard, hover over the Whols menu item in the left sidebar. A submenu will expand, revealing several options. Click on Form Builder to open the wholesale registration form editor.
Understanding the Interface
The Form Builder displays your registration form in real-time as you make changes. The left side shows your current form fields, and the right side provides editing options for whichever field you’ve selected.
At the top of the Form Builder, you’ll see three action buttons:
- Edit: Modify settings for any selected field.
- Delete: Remove a field from the form.
- Add Field (+ icon): Insert new fields into your registration form.
Viewing the Live Preview
Before making any changes, take a moment to review your default registration form structure. By default, Whols includes basic fields like First Name, Last Name, Username, and Password. These provide a solid foundation that you’ll customize and expand.
For a detailed walkthrough of every Form Builder option, see the Wholesale Form Builder in Whols documentation.
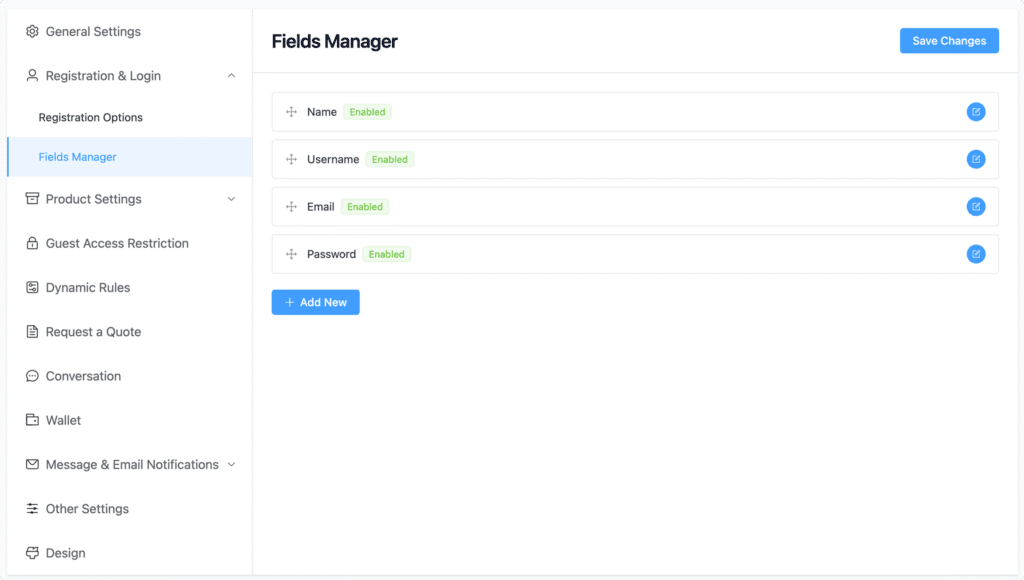
Step 3: Customize Default Registration Fields
Your form comes with essential default fields already in place. Rather than starting from scratch, you’ll want to review and customize these to match your business terminology and requirements.
Editing Field Labels and Settings
How to Edit Any Existing Field:
- Click on any field in the Form Builder to select it
- Click the edit icon (pencil symbol) that appears next to the field
- The Input Customization panel opens on the right side
Within the customization panel, you can control:
| Setting | What It Does |
| Field Label | Changes the name shown to the user (e.g., “Username” → “Preferred Username”) |
| Field Description | Adds helper text below the label (e.g., “This will be your login username”) |
| Required / Optional | Determines whether the field must be filled before submitting |
| Default Value | Pre-populates the field with suggested text |
| Placeholder Text | Shows example text inside the field that disappears when the user starts typing |
| Custom CSS Class | Adds CSS classes for advanced styling |
Minimum Fields to Keep
Keep these fields as required at minimum:
At minimum, ensure these fields remain:
- Email: Required for account creation and communication
- Password: Essential for login security
- First Name and Last Name: Helps personalize communications.
Field Count Guideline
Aim for 6–8 fields maximum in your final form. Registration completion drops significantly when forms exceed 10 fields. Collect only what you need to make an approval decision.
Step 4: Add Custom Fields to Your Form
Custom fields are how you collect business-specific information that the default WooCommerce registration form does not capture. Whols supports text inputs, dropdowns, checkboxes, radio buttons, and file uploads — all without code.
Understanding Field Types
The Whols plugin offers three categories of fields you can add:
- Default Fields: Standard WordPress and WooCommerce fields like additional email addresses, phone numbers, or billing address components.
- WooCommerce Fields: Pre-built fields that sync with WooCommerce’s standard customer data, including company name, billing address, phone, and other business details.
- Custom Fields: Custom input types including text inputs, text areas, checkboxes, radio buttons, dropdown menus, and file uploads.
How to Add a New Field: Step-by-Step
Step 4.1: Click the Plus Icon
Hover your mouse over the location where you want to insert a new field. A plus (+) icon will appear. Click it to open the field type selector.
Step 4.2: Choose Your Field Type
A modal window displays all available field categories. Select the appropriate category, then choose the specific field you want to add. For most wholesale operations, you’ll use WooCommerce fields and custom fields.
Step 4.3: Configure Field Settings
After selecting a field, the customization panel appears automatically. Configure the field exactly as needed:
- Make it required or optional
- Set a label and description
- Add placeholder text if helpful
- Choose CSS classes for styling
Step 4.4: Click Save to apply the field to your form.
Essential Custom Fields for Wholesale Registration
These fields provide the most practical value for vetting and serving wholesale accounts:
| Field | Type | Required? | Why It Matters |
| Company / Business Name | Text | ✅ Required | Essential for tax documentation and communication |
| Tax ID / EIN | Text | ✅ Required | Verifies wholesale eligibility and tax compliance |
| Resale Certificate Number | Text | Recommended | Confirms legal resale authorization in most jurisdictions |
| Business Phone | Phone | ✅ Required | Direct contact for order issues and deliveries |
| Preferred Minimum Order Quantity | Dropdown | Optional | Helps applicants self-qualify; options: “10–25 units”, “25–50 units”, “50+ units” |
| Business License | File Upload | Optional | Stricter vetting — restrict to PDF, JPG, PNG, max 2MB |
| Preferred Payment Terms | Dropdown | Recommended | Options: “Net 30”, “Net 60”, “Credit Card”, “Wire Transfer” |
Pro tip: Collect only what you need to approve the account. Any field that does not affect your approval decision should be moved to a post-approval onboarding survey.
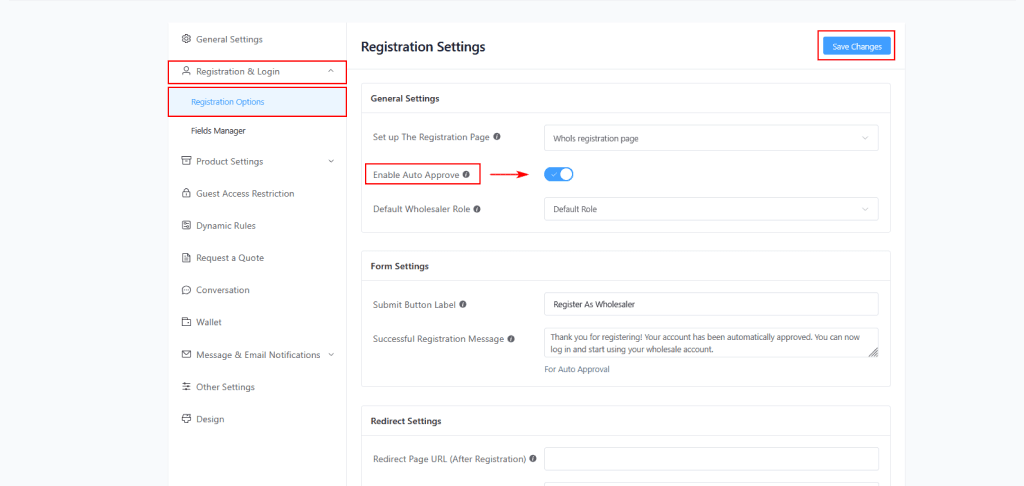
Step 5: Configure the Approval Method
Whols gives you two approval methods: Auto-Approve (instant access on form submission) or Manual Approval (registrants wait in a pending state until you review them).
To configure your approval method:
- Go to Whols → Settings → General Settings
- Find the “Enable Auto Approve” checkbox
- Check the box for instant auto-approval, or leave it unchecked for manual review
- Click Save Changes
For a complete guide on choosing between auto-approve and manual approval — including fraud risk analysis, conversion impact data, and industry-specific recommendations — see:
👉 WooCommerce Wholesale Registration Approval: Auto Approve vs. Manual
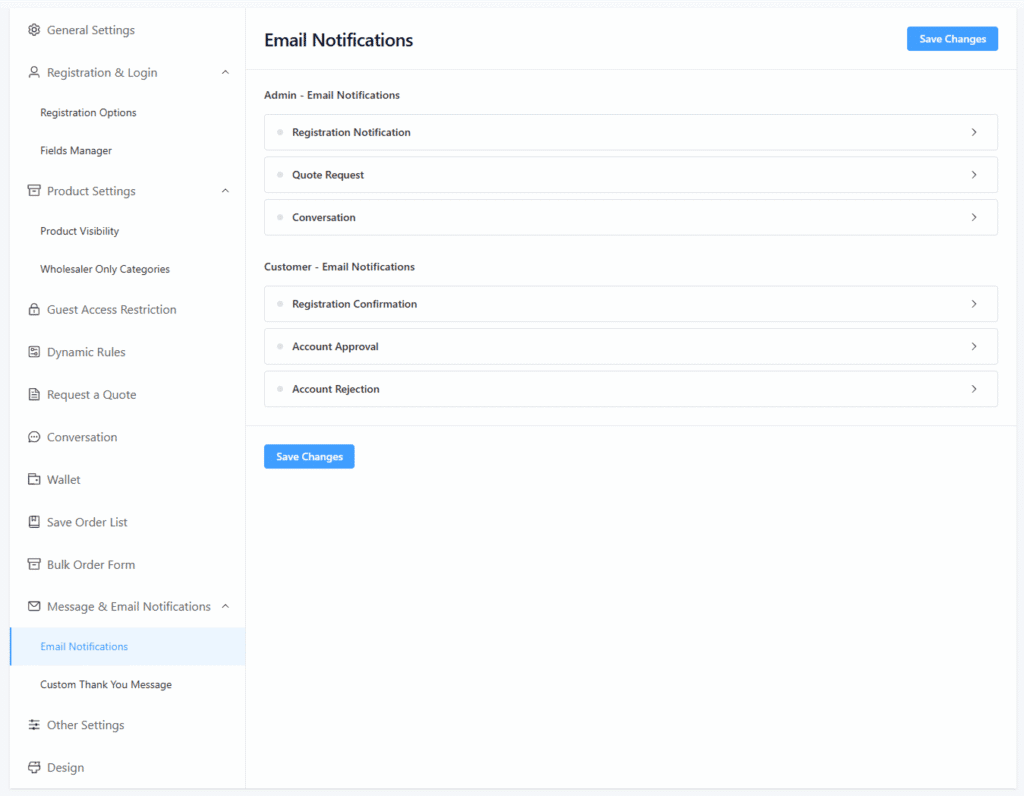
Step 6: Set Up Email Notifications
Email notifications are the communication backbone of your wholesale registration system. They confirm submissions, alert admins to new applications, and notify applicants of their approval status.
How to Configure Email Notifications
- Go to Whols → Settings → Registration & Login
- Scroll to the Registration Messages section.
Email Types Your System Sends
| Sent To | When | |
|---|---|---|
| Registration Confirmation | Applicant | Immediately after form submission |
| Pending Approval Notification | Applicant | When manual approval is enabled |
| Admin New Application Alert | Admin | When a new application is submitted |
| Approval Notification | Applicant | When their account is approved |
| Rejection Notification | Applicant | If their application is declined |
Customizing Your Registration Messages
Whols has two separate message fields:
Registration Successful Message (shown when Auto-Approve is ON):
xml<strong>Welcome!</strong> Your wholesale account is now active.
<a href="/shop">Start shopping →</a>
Contact us at [email protected] with any questions.
Successful Registration Message (shown when Auto-Approve is OFF / Manual):
xml<strong>Thank you for registering.</strong>
Our team will review your application within <strong>1 business day</strong>
and send you a decision by email.
Both fields support full HTML formatting, including bold text, links, line breaks, and embedded images.
Setting Redirect URLs
After registration, you can send users to a specific page instead of the default My Account page.
Redirect Page URL (After Registration):
- A “Thank You for Applying” page with timeline expectations
- Your wholesale catalog (for auto-approve only)
- A resource page with wholesale program details
Redirect Page URL (After Login):
- Your wholesale shop page
- A custom wholesale dashboard
- Your latest B2B product collection
Both redirect fields are in Whols → Settings → General Settings. Leave blank to use WooCommerce default behavior.
Step 7: Create a Dedicated Registration Page
The shortcode [whols_registration_form] displays your Whols form on any WordPress page. Create a dedicated “Wholesale Registration” page, add the shortcode, and publish.
Step 7.1: Create a New Page
- From your WordPress dashboard, go to Pages → Add New
- Give your page a clear title:
- “Wholesale Registration”
- “Apply for a Wholesale Account”
- “Become a Wholesale Partner”
Step 7.2: Add the Registration Form Shortcode
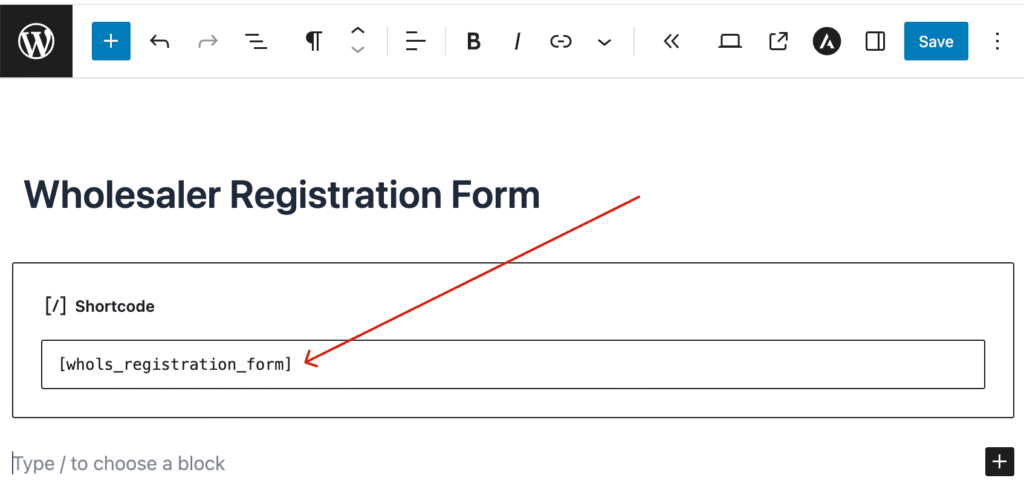
In the page editor:
- Click the + button to add a new block
- Search for Shortcode and select the Shortcode block
- Paste:
[whols_registration_form]
Step 7.3: Add Supporting Content Before the Form
Before the shortcode, add a short section that tells applicants what your wholesale program offers and what they need to apply. Include:
Who qualifies:
“We work with established retailers, online resellers, and event planners. Registration takes 5 minutes.”
Program benefits:
- Tiered pricing based on order volume
- Extended payment terms (Net 30/60)
- Dedicated wholesale support
- Access to exclusive products and early new-collection previews
Requirements:
- Valid business registration
- Tax ID or EIN
- Resale certificate (if applicable)
Approval timeline:
“After you submit this form, our wholesale team will review your application within 2 business days.”
Clear expectations before the form reduce abandonment and cut “where is my account?” support emails by a significant margin.
Step 7.4: Publish the Page
Click Publish to make your registration page live.
Make the Page Easy to Find
- Main menu — Add a menu item: “Wholesale” or “Become a Partner”
- Footer — Add a link under “For Business Partners”
- Homepage — Add a call-to-action button that links to the registration page
- Email signatures — Include the link in outreach emails to potential wholesale inquiries
Step 8: Test Your Registration Form Before Going Live
Before sending buyers to your registration page, submit a test application yourself to verify the full workflow end-to-end. This catches broken email delivery, wrong role assignments, and redirect errors before real buyers experience them.
Testing Checklist
- Open the registration page in an incognito browser window (so you are not logged in as admin)
- Submit a test application using a secondary email address you own
- Check if the correct post-registration message appears (auto-approve success message or pending message)
- Check if the redirect works — does the page send you to the correct URL?
- Check your inbox — did the registration confirmation email arrive? Check spam too
- Check WordPress Admin → Users — is the test user created with the correct wholesale role?
- If manual approval: approve the test user and confirm the approval email is received
- Log in as the test user — does the post-login redirect send them to the correct page?
- Verify wholesale prices are visible to the logged-in test user
If any step fails, refer to the Troubleshooting section below.
Form Conversion Optimization
A technically correct registration form still fails if it creates unnecessary friction. These adjustments directly increase how many visitors complete and submit your form.
Keep Fields to a Maximum of 8
Registration completion rate drops sharply beyond 8–10 fields. Ask yourself for every field:
- Does it help you determine the applicant’s pricing tier?
- Will you use this information to contact them?
- Is it required for legal or tax compliance?
If the answer to all three is no, remove it. You can collect “nice to have” information in a post-approval onboarding survey instead.
Put the Easiest Fields First
Start your form with fields buyers can complete instantly (name, email, company name). Place heavier fields (tax ID, file uploads) toward the end. This reduces early abandonment — buyers are already invested by the time they reach the harder fields.
Write a Stronger CTA Button
The default “Submit” button is weak. Test these alternatives:
- “Apply for Wholesale Access”
- “Submit My Application”
- “Join the Wholesale Program”
Action-specific copy outperforms generic labels because it reminds buyers what they are getting.
Add Trust Signals Near the Form
Place these elements close to the form to reduce hesitation:
- Download count or active user count (“Trusted by 500+ wholesale retailers”)
- A short testimonial from an existing wholesale customer
- A brief note on your approval timeline (“Most applications reviewed within 1 business day”)
Optimize for Mobile
More than 50% of B2B buyers research vendors and begin applications on mobile devices. Before going live:
- Check the form renders correctly on a smartphone screen
- Confirm all fields are tappable without needing to zoom
- Verify the submit button is visible without scrolling on most common screen sizes.
How to Prevent Spam and Fake Applications
Auto-approve creates a higher risk of fake or low-quality wholesale registrations. Even manual approval setups receive spam submissions that waste review time. These steps reduce fraudulent applications at the form level.
Add a CAPTCHA to the Registration Form
The most effective spam prevention is a CAPTCHA on the registration form. Options compatible with WordPress and WooCommerce:
- Google reCAPTCHA v3 (invisible, no user friction) — install via a plugin like “Simple Google reCAPTCHA”
- hCaptcha — privacy-focused alternative to reCAPTCHA
- Cloudflare Turnstile — lightweight, no challenge puzzle, high effectiveness
Place CAPTCHA verification just before the submit button.
Use a Honeypot Field
A honeypot is a hidden form field that real users never see but bots fill in automatically. When a submission includes data in the honeypot field, it gets discarded silently. Many WordPress anti-spam plugins add honeypot fields automatically (e.g., WPForms, Gravity Forms, or standalone anti-spam plugins).
Require a Business Email Address
Reject applications that use personal email providers (Gmail, Yahoo, Hotmail, Outlook) during form validation. Legitimate wholesale buyers typically use company domain emails. This can be enforced with a custom validation rule or a dedicated email verification plugin.
Post-Submission Audit for Auto-Approve Stores
If you use auto-approve for speed, run a monthly audit of accounts created in the past 30 days:
- Go to WordPress Admin → Users → Filter by wholesale role
- Look for accounts with no orders placed after 30 days
- Look for accounts with mismatched business name and email domain
- Downgrade suspicious accounts to a non-wholesale role pending manual verification
Best Practices for Wholesale Registration Forms
1. Set an Explicit Approval Timeline
Uncertainty is the #1 cause of wholesale applicant abandonment. Tell applicants exactly when they will hear back:
- “Applications reviewed within 24 hours”
- “Decisions made within 2 business days”
- “You will receive an email decision within 5 business days”
Set this expectation both on the registration page and in the post-submission message. Then meet it consistently. Nothing damages B2B credibility faster than applicants waiting a week without a response.
2. Write Clear, Active-Voice Messaging
Your registration page represents your brand to potential wholesale partners. Avoid passive and corporate-sounding language.
Do:
- “Join our wholesale program and access bulk pricing” ✅
- “We review applications within 1 business day” ✅
- “Trusted by 500+ retailers across North America” ✅
Avoid:
- “Our wholesale program can be joined by eligible businesses” ❌
- “Applications are subject to review” ❌
- “Please allow time for processing” ❌
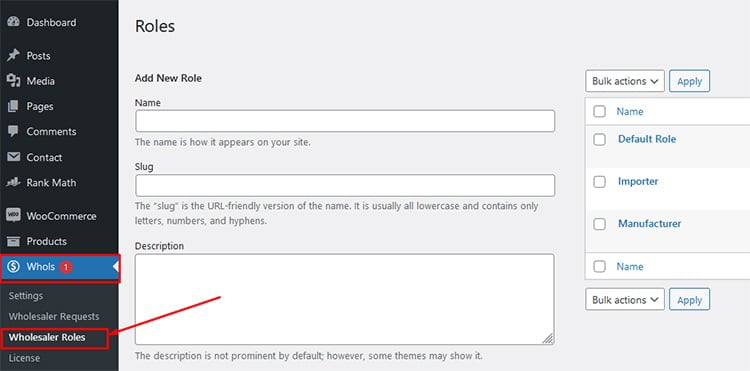
3. Use Tiered Role Assignment for Scalable Pricing
If your store serves multiple buyer types, assign a default entry-level wholesale role to new registrants and upgrade high-value accounts manually:
| Tier | Buyer Type | Minimum Order | Discount |
|---|---|---|---|
| Tier 1 (Default) | Emerging wholesalers | 10–25 units | 10–20% |
| Tier 2 | Mid-volume resellers | 25–50 units | 25–35% |
| Tier 3 | High-volume retailers | 100+ units | 40–50% |
Set the default role in Whols → Settings → General Settings → Default Wholesaler Role. This option requires the Pricing Model to be set to “Multiple Role.”
4. Link the Registration Page from High-Traffic Pages
Your registration form only converts buyers who can find it. Place links to it from:
- Your homepage hero section or navigation
- Product pages (for buyers viewing items they want to purchase wholesale)
- Blog posts and guides about wholesale pricing
- Your “Contact Us” page for B2B inquiries
5. Send Follow-Up Communications During Manual Review
Keep applicants engaged during the review period with a simple email sequence:
- Day 1 — Registration confirmation: “Your application is under review.”
- Day 2–3 — If still pending: “We’re still reviewing your application. Thank you for your patience.”
- Day 5+ — Final decision: Approval with login details, or polite rejection with an alternative contact
This reduces “where is my account?” support requests and improves your wholesale program’s professional reputation.
Troubleshooting Common Issues
Even with a perfect setup, you may encounter occasional issues. Here’s how to resolve the most common problems:
Issue- 1: Registration Form Not Displaying
Symptom: The shortcode appears as text instead of displaying a form.
Solution:
- Verify the Whols plugin is activated (check Plugins → Installed Plugins)
- Confirm you are using the exact shortcode:
[whols_registration_form] - Clear your page cache if you are using a caching plugin (WP Rocket, W3 Total Cache, etc.)
- Try adding the shortcode to a different test page to rule out page-level conflicts
- Temporarily disable other active plugins to check for conflicts.
Issue-2: Emails Not Sending
Symptom: Users register but never receive confirmation emails.
Solution:
- Test your site’s outgoing email via Tools → Email Test (using a plugin like WP Mail SMTP)
- Verify email settings in Whols → Settings → Email
- Check your spam and junk folder
- Confirm the admin email address is correct in WordPress → Settings → General
- Install and configure WP Mail SMTP to send email through a reliable SMTP provider (Gmail, SendGrid, Mailgun)
- Contact your hosting provider to confirm outgoing port 587 or 465 is not blocked
Issue-3: Custom Fields Not Saving
Symptom: You add fields to the form, but they don’t appear.
Solution:
- Ensure you click “Save” after adding fields
- Clear your browser cache
- Try a different browser to rule out cache issues
- Verify you’re using compatible field types
- Check for JavaScript errors in the browser console (F12 key)
Issue-4: Users Can’t Log In After Approval
Symptom: Approved users receive “invalid credentials” messages when attempting to log in.
Solution:
- Confirm the approval setting is correctly saved (auto-approve or manual)
- Verify the Default Wholesaler Role is selected in General Settings
- Confirm the user received their login credentials by email
- Have the user attempt a password reset via the WooCommerce login page
- Log in to WordPress admin as the user (Users → Edit User → Set password manually) to test
Issue-5: Wrong Default Role Being Applied
Symptom: New registrants receive the wrong role after approval.
Solution:
- Go to Whols → Settings → General Settings → Pricing Model.
- Confirm “Multiple Role” is selected.
- Verify the correct role is selected in Default Wholesaler Role dropdown.
- Save settings and submit a new test registration to verify the fix.
- For manual approvals: confirm you are selecting the correct role during the approval step in Users → Edit User.
Frequently Asked Questions
What shortcode do I use to display the Whols registration form?
Add [whols_registration_form] to any WordPress page using a Shortcode block in the Gutenberg editor. Create a dedicated “Wholesale Registration” page for the best results. The form renders automatically when the page is published.
How do I add custom fields like business name or tax ID to the registration form?
Go to Whols → Form Builder, click the plus (+) icon where you want the new field, select the field type (text, dropdown, file upload, etc.), configure the label and required/optional setting, and click Save. No coding is required.
Can I require document uploads (like tax certificates) during registration?
Yes. Use the File Upload custom field type in the Form Builder. You can restrict accepted file types (PDF, JPG, PNG) and set a maximum file size (recommended: 2MB maximum). The uploaded files are accessible from the user’s profile in WordPress Admin.
How do I change a customer’s wholesale role after they are approved?
Go to WordPress Admin → Users → Edit User and scroll to the Role field. Change the role to the appropriate wholesale tier. The customer will receive a notification email automatically.
Can I create multiple registration forms for different customer types?
The Whols free version supports one registration form. The Pro version supports multiple forms with unique fields and approval rules for different customer segments (for example, a domestic reseller form and a separate international distributor form).
Can I customize the email notification content for wholesale registrations?
Yes. Go to Whols → Settings → Email to edit sender name, sender address, and reply-to email. Go to Whols → Settings → Registration & Login to edit the post-registration message body. Both fields support HTML.
Conclusion
Setting up a WooCommerce wholesale registration form is the first real step in building a professional B2B operation. Done well, it protects your wholesale pricing from unauthorized access, automates your buyer vetting process, and creates the kind of structured onboarding experience that serious wholesale buyers expect.
With Whols, the entire setup — form fields, approval method, email notifications, and registration page — can be live in under an hour without writing a single line of code.
Start with the seven steps in this guide, run a full test before going live, and refine your form fields based on what information you actually use to make approval decisions. The fewer fields you have, the higher your completion rate. The clearer your messaging, the fewer support tickets you receive.
For your next step after the form is live, read WooCommerce Wholesale Registration Approval: Auto Approve vs. Manual to configure exactly who gets access and how quickly.
Ready to start? Try Whols free and have your wholesale registration form live today.